Just as I promised in my last post, here is the tutorial for my burlap table runner. I don’t think I’ll be making another right away (I found a great soon-to-be-shared alternative at Ikea the other day), but I wanted to share with you all nonetheless!

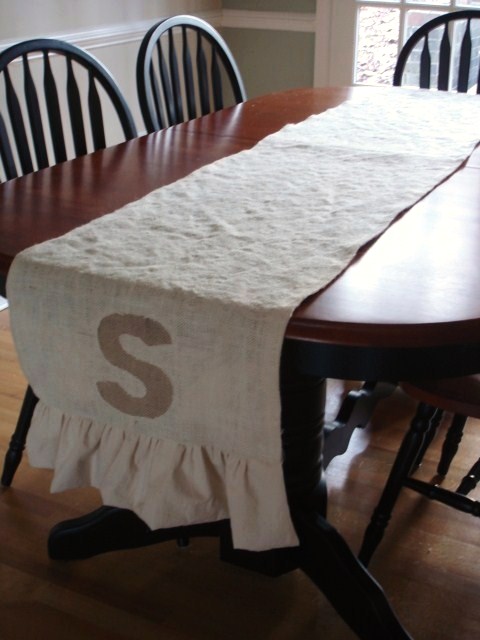
I hesitated jumping on the table runner bandwagon, but now that I have one my own, I love it and it just makes my dining room feel complete. This one may be a little different than the burlap table runners you have seen lately, in that it features reverse applique for the monogram, and has a (huge, beautiful) ruffle at the bottom.
Materials Needed:
burlap
contrasting fabric for applique
fabric for ruffle
sewing machine (the sewing here is very basic…honest!)
Step 1: Decide on your length and width of your table runner. I basically just laid my burlap across my dining room table and eyeballed it to decide how long and wide I wanted it. I knew I wanted it to be a bit wider than the tray I use as a centerpiece, and I allowed a bit for seam allowances.
Because of the size of my dining room table, I needed to cut two strips of burlap for the runner to be long enough.
Step 2: I took my two pieces of burlap, laid them on top of each other right sides together (does burlap even have a right and wrong side? I couldn’t tell), sewed the strips together, and pressed open the seam allowance.

Notice I sewed the two strips together with a very generous seam allowance…because of how quickly and easily burlap unravels, I didn’t want to sew too close to the end and have it unravel on me. If you have too much excess, you can easily trim that off before moving on to the next step.
Step 3: Place your runner on your table to make sure you are happy with the general size.

Step 4: Next, fold under the edge of the runner (going lengthwise) about 1/2″ and sew. You can press this edge before sewing if you would like, I didn’t and it turned out fine. Normally, I like to do this a second time to hide the raw edge, but didn’t so that the edge of the runner didn’t end up being so thick. I didn’t want a guest to put a glass down on edge and have it tip over, so I only did one fold over.

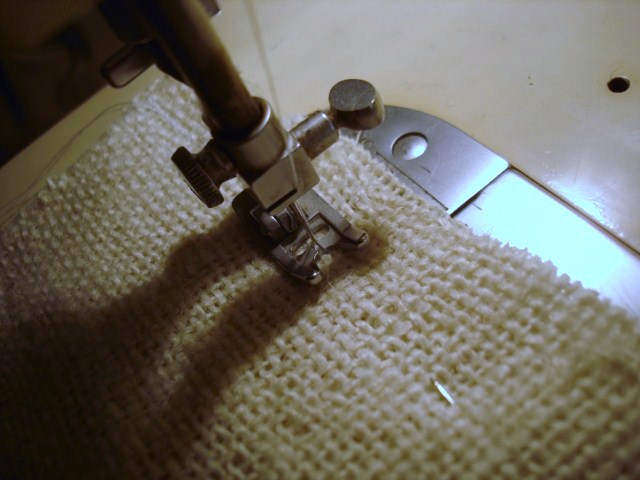
Step 5: Now you are ready to do your applique! Reverse applique is so easy and quick, and I am sure there are a million ways to to do it, this is just how I did mine. For a monogram, print out your choice of letter(s) in the font and size that you want. You can also freehand this if you would like; just outline your letter directly onto your burlap. I placed my “S” just a few inches from the bottom of my runner.

Next, you will need to pin down your letter. Then, on the back of your runner, directly behind your letter, pin down whatever fabric you would like to show through your runner. I debated between the three fabrics above, but ended up just choosing the darker color of burlap. Make sure to cut a large enough piece of fabric to cover this area…we will be stitching around your monogram letter, and you want to make sure you have enough fabric to cover the letter!

Now, you will need to turn your runner back over, and stitch around the letter you pinned down. The letter is acting as a guide, stitch around it best you can, but if you happen to stitch onto the letter itself, that is fine, it will tear away fairly easily. The goal is to get as close to the letter as possible. Next, remove your letter. The next picture shows the back of my runner after the stitching is complete, can you see the white stitches forming the “S”?

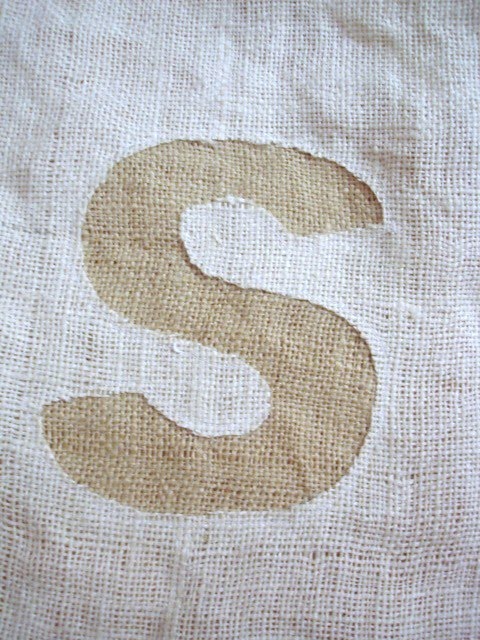
Take a second and cut off the excess fabric off of the back of your runner. And, for the final step, turn the runner back to the right side, and carefully cut out the letter form that you just stitched. Make sure not to cut through the back fabric, in this case, the darker burlap.

Step 6: Now you are ready to make your ruffle. I am not going to go through the process here, as 1) I did so in this post of mine not long ago, and 2) I am sure that there are much better ways of making a ruffle than how I did it. I googled it and found plenty of information as well. I wanted a fairly long ruffle for my runner, and used a neutral colored muslin to make it. At first I tried to make a ruffle out of the same darker burlap as my monogram, but it didn’t work for me, the burlap was way too stiff to gather easily. Once your ruffle is made, pin the ruffle to the runner, right sides together and stitch.

Make a ruffle for the other side of your runner, and you are done! Now wasn’t that easy? I promise you it took me as long to make my runner as it did to write this post!

simone leblanc
Thursday 12th of August 2010
looks fantastic!
Josh Healy
Friday 6th of August 2010
Hi, hope it's OK to contact you here. We would love to include your blog on our giveaway search engine: Giveaway Scout (http://www.giveawayscout.com). Have a look and if interested, use our online form to add your blog (http://www.giveawayscout.com/addblog/ ). thanks, Josh
Heather Allen
Thursday 5th of August 2010
I LOVE this! It is so beautiful!