Want to learn how to make easy paper rosettes? Rosettes make the perfect wall art, and are also great for party decor or for a photo backdrop!
I am all about easy paper crafts that don’t cost a lot of money or take a lot of time to make.
And if that paper craft also makes a stunning wall display, all the better!
Today, it’s all about this easy craft for kids and adults alike…paper rosettes!

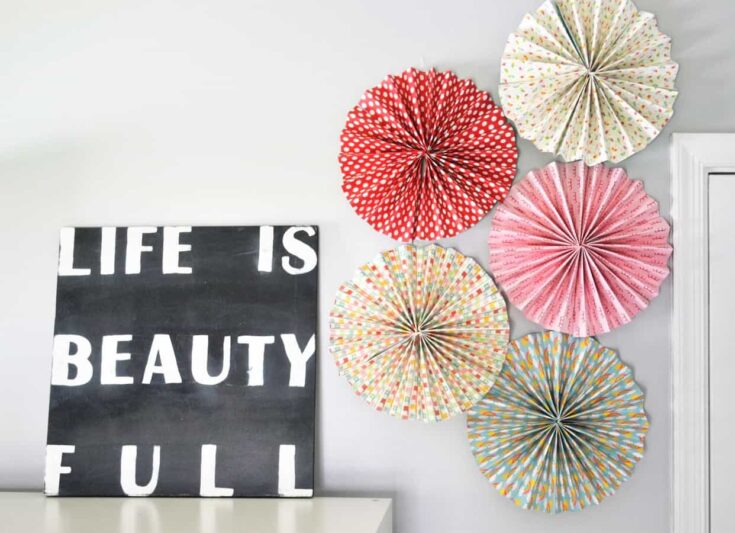
From last week’s craft room tour, you may remember the paper rosettes hanging on either side of the window.
They were a last minute addition, but I’m so glad I took the time to make and hang them–they add such a fun, creative element to the space, don’t you think?
They were much easier to make than I thought–I created all dozen or so of them in the space of a couple of How I Met Your Mother episodes on Netflix.
Want to make some of your own? Here’s how I did it.
How to Make Large Paper Rosettes
You can scroll down for full instructions and a printable DIY card.
Materials:
scrapbook paper
hot glue
scissors (to create different sizes, if desired)
Step 1: Choose your scrapbook paper (I went with shades of pink, blue, gray, and black and white). You can find scrapbook paper in almost any color scheme or theme you want!
You’ll want full size, 12×12 pieces of scrapbook paper for these to work best, though.
For each rosette, three sheets of scrapbook paper is ideal, but you can get away with two sheets if you’d like (I’ll show you the difference between using two or three sheets later in the post)!
The tutorial below shows a rosette created with two sheets of paper.
Take each sheet of scrapbook paper and fold it accordion style.


Step 2: Take each accordion-folded sheet of paper, and fold it in half.
Then, using hot glue, attach the two inner pieces of paper so that, once dry, they’ll look like the example below…

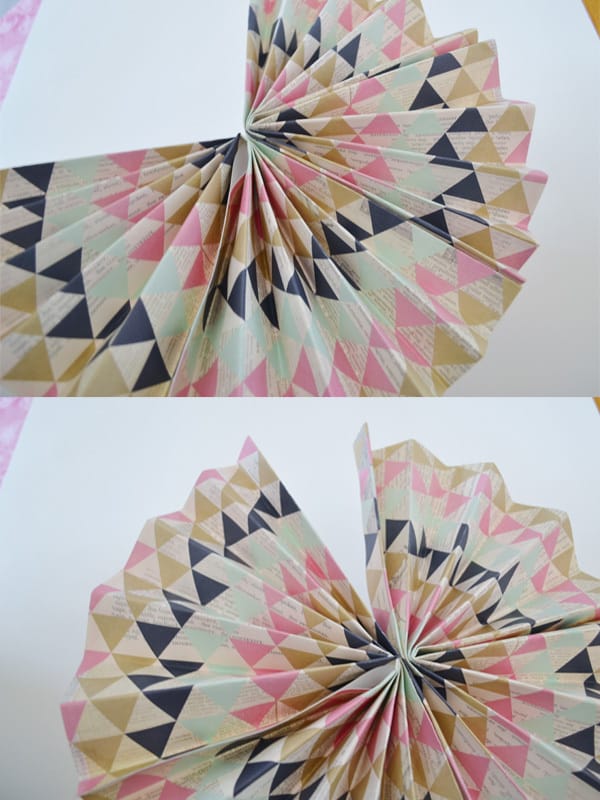
Step 3: You’ll now need to take your two (or three) fan-shaped pieces and hot glue them together to form your rosette.
First, lay your two pieces side by side, take the ends where they meet, and hot glue them together (as in top picture below).
Once secure, open each side of the rosette until the sides meet again (see second picture below), and hot glue them together.
Paper Rosettes
How to Make Paper Rosettes
Want to learn how to make easy paper rosettes?
Rosettes make the perfect wall art, and are also great for party decor or for a photo backdrop!
Materials
Tools
- scissors (to create different sizes, if desired)
Instructions
Choose your scrapbook paper (I went with shades of pink, blue, gray, and black and white).
For each rosette, three sheets of scrapbook paper is ideal, but you can get away with two sheets if you'd like.
This tutorial below shows a rosette created with two sheets of paper. Scroll down in the post to see the difference in fullness between using two and three sheets of paper.
Take each sheet of scrapbook paper and fold it accordion style.
Take each accordion-folded sheet of paper, and fold it in half.
Then, using hot glue, attach the two inner pieces of paper so that, once dry, they'll look like the example in the post.
You'll now need to take your two (or three) fan-shaped pieces and hot glue them together to form your rosette.
First, lay your two pieces side by side, take the ends where they meet, and hot glue them together (as in top picture below).
Once secure, open each side of the rosette until the sides meet again (see second picture below), and hot glue them together.
Your rosette is now ready to hang!
Notes
**How to hang rosettes: I like to use plate hangers to hang rosettes on the wall. If you don't have any, you can get away with hot gluing a paper clip to the back of your rosette. Hammer a nail into your wall (or use a command hook), and hang your rosette by the top loop of your paper clip.
And that’s it!
You can see the difference between using two sheets of scrapbook paper and using three sheets in the picture below…the black and white one used three sheets, and is therefore a bit fuller than the striped one below it with two sheets.
I recommend the three-sheet method, but try both out so you can an idea of which you like better!
In short, though, three sheets will yield puffier, larger paper rosettes.

I encourage you to try to make these yourself!
It’s such a fun rainy day craft idea.
If you (like me, have a lot of scrapbook paper lying around, try out one of these scrapbook paper storage ideas)!
I hung mine in my craft room, but they’d be great for a nursery or playroom. If you make these, please share a picture with me!
Thanks for reading all about my paper rosettes! Have a crafty day!
Sara
Thursday 17th of April 2014
These rosettes are so sweet and are just what I'm always looking for when planning parties for the family. Thanks so much for sharing your tutorial!
I'd love it if you could pop over and share with us over at Tell it To Me Tuesday!
Lolly Jane
Sunday 13th of April 2014
Love these paper rosettes- a great way to use up wall space AND they're just pretty! :) Thanks for sharing at the Sunday Soiree- hope you'll come back and party with us (and see these on our site tomorrow!) xo
Alison
Friday 4th of April 2014
I love these! I just found you through Tatertots and Jello. I can't wait to make some paper rosettes myself. Thanks so much for the tutorial! Have a wonderful weekend!