Yesterday, I shared this post on my french chair makeover…

I knew that I wanted it covered in something grain sack-ish…I love the neutral, cozy farmhouse feel of grain sacks, but after looking at them online (or, rather, the pricing of them), I quickly realized I couldn’t justify the cost for my first upholstery project.
Enter my trusty go-to: the dropcloth. With nothing but some dropcloth fabric, painters tape, some craft paint and a paintbrush, I had something that wasn’t quite the real thing…it just looked like it was.
Step 1: In my experience, aligning and painting the stripes is best done AFTER fabric is attached to chair. Like I mentioned in my last post, stripes can be hard to line up correctly, especially with all the tugging and yanking you have to do to get the fabric taut.
So, first attach your fabric to your piece, then use painters tape to mark your stripes. I stuck one piece down the center, and one piece on either side of this piece to form two stripes.

Step 2: Press tape firmly into fabric! The last thing you want is for the paint to creep underneath the tape. Truly. I’m not sure what I would have done if this had happened, but, fortunately, it didn’t.
Using just a little paint at a time, paint between your strips of tape to form your stripes. Use paint sparingly, as you want the slightly worn, shabby look of grain sacks…not perfect, bright stripes.

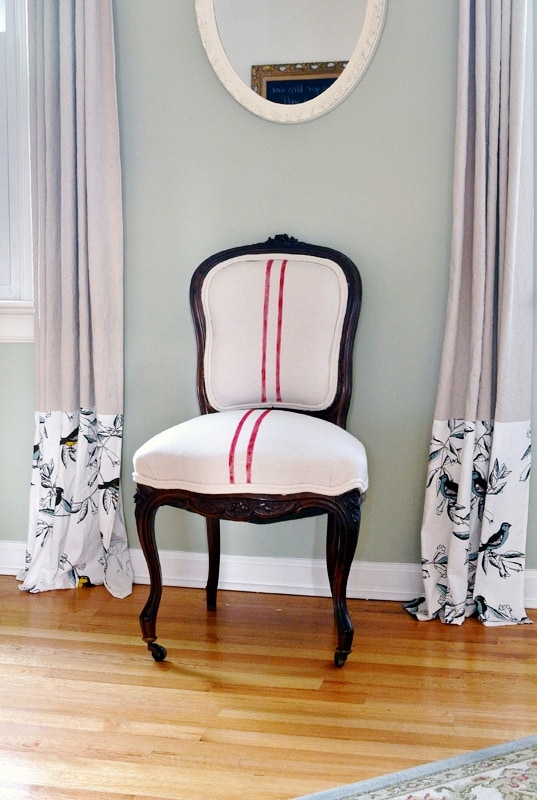
Remove tape, and voila!
Grain sack perfection, imperfectly done (smiles).
Add some double cording (I made this myself but didn’t take pictures) and you’re done!
Teresa
Friday 6th of January 2012
Just found you through The Shabby Nest. I love that beautiful chair! I have yet to upholster anything but I'm working up my courage and getting closer. I'll be following you : )